

Description
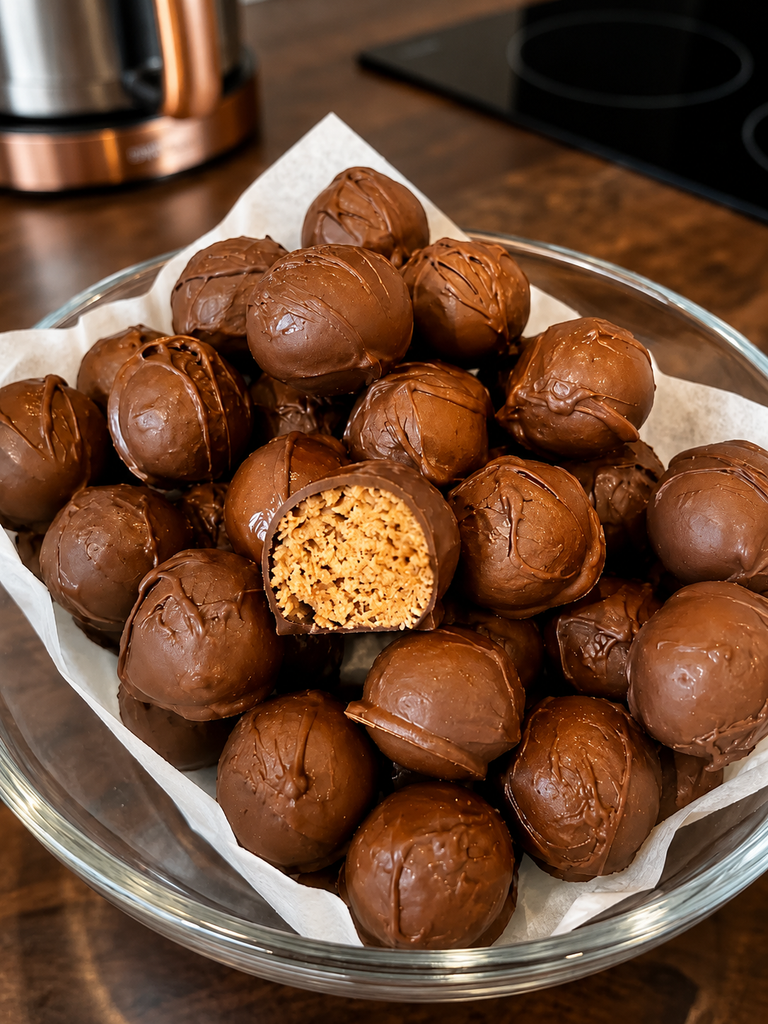
These Peanut Butter Balls are rich, creamy, chocolatey, and incredibly satisfying. A soft peanut butter protein center is rolled into bite-sized balls and coated with smooth sugar-free chocolate for an indulgent-tasting treat.
Made with peanut butter, protein powder, almond flour, and a low-sugar sweetener, these no-bake bites offer a convenient high-protein, low-carb snack.
They are quick to prepare, easy to portion, and perfect when you want something sweet without making a traditional baked dessert.
Can This Peanut Butter Balls Recipe Support Weight Loss Goals?
These Peanut Butter Balls can fit into a weight-conscious eating plan when enjoyed in appropriate portions. Peanut butter and protein powder provide protein and fat that can make a small serving satisfying, while using a low-sugar sweetener and sugar-free chocolate helps keep added sugar lower. Because nuts, peanut butter, and chocolate are calorie-dense, portion size still matters. Pairing one or two balls with an overall balanced eating pattern can make them a practical alternative to larger, more sugary desserts.
Does Peanut Butter Balls Fit a High-Protein Lifestyle?
Yes, these Peanut Butter Balls can fit a high-protein lifestyle, particularly compared with many conventional candy-style treats. The recipe uses whey protein powder, peanut butter, and almond flour to provide protein while keeping the recipe relatively low in carbohydrates. Using sugar-free chocolate and a low-carb sweetener helps keep the estimated net carbs moderate. Each serving provides approximately 8 g of protein, making these bites a convenient protein-containing snack or dessert.
Why This Recipe Is Special
- High-protein treat: Whey protein powder gives the peanut butter center an extra protein boost.
- Low-carb friendly: Almond flour and a low-carb sweetener help reduce carbohydrates.
- No-bake: There is no oven required, making this recipe quick and beginner-friendly.
- Chocolate and peanut butter: The classic combination makes these bites taste like a decadent candy.
- Perfectly portioned: Small individual balls make it easier to enjoy a controlled serving.
My Personal Experience
- The peanut butter center is my favorite:
The filling is soft, creamy, and slightly crumbly without being overly sweet.
The chocolate shell gives each bite a delicious contrast in texture. - They are incredibly easy to prepare:
The mixture comes together in one bowl without complicated baking techniques.
After chilling, the balls are ready to dip and coat. - The chocolate coating makes them feel special:
A smooth chocolate shell turns a simple protein bite into a dessert-style treat.
A little extra chocolate drizzle on top gives them an attractive homemade finish. - They are convenient for portion control:
Making individual balls means you can prepare several servings at once.
They are easy to grab from the refrigerator whenever you want a small treat. - The recipe is easy to customize:
Extra vanilla, cinnamon, chopped peanuts, or a pinch of sea salt can change the flavor.
You can also adjust the sweetness to suit your preferred taste.
Perfect For
These Peanut Butter Balls are perfect for snacks, desserts, meal prep, lunch boxes, afternoon cravings, post-workout snacks, parties, holiday treat trays, and low-carb meal plans. They are particularly convenient because they can be prepared ahead and stored in the refrigerator or freezer.
Why You’ll Love This Recipe
- No oven required
Simply mix, shape, chill, and coat the balls in chocolate.
It is an easy dessert when you don’t want to heat up the kitchen. - Rich peanut butter flavor
Natural peanut butter gives the filling a deep, nutty taste.
Every bite tastes satisfying even without large amounts of added sugar. - Chocolate-covered goodness
The smooth chocolate coating adds richness and a pleasant snap after chilling.
A drizzle of extra chocolate makes them look bakery-worthy. - Protein-packed center
Whey protein powder adds meaningful protein to every bite.
This makes the dessert more substantial than ordinary peanut butter candies. - Great for meal prep
Make a batch on the weekend and refrigerate individual portions.
They remain convenient for quick snacks throughout the week.
Common Mistakes to Avoid
- Making the mixture too dry — Protein powders absorb moisture differently, so add the milk gradually until the mixture holds together easily.
- Using overly runny peanut butter — Very oily natural peanut butter can make the mixture difficult to shape; stir it thoroughly before measuring.
- Skipping the chilling step — Chilling firms the balls and makes them much easier to dip in melted chocolate.
- Overheating the chocolate — Melt it gently over low heat or in short microwave intervals to prevent scorching and separation.
Required Equipment
- Large mixing bowl — Provides enough room to thoroughly combine the protein mixture.
- Rubber spatula — Makes mixing the thick peanut butter dough easier.
- Small cookie scoop — Creates evenly sized portions for consistent nutrition.
- Baking sheet or tray — Provides a flat surface for chilling the shaped balls.
- Parchment paper — Prevents the chocolate-coated balls from sticking.
- Microwave-safe bowl — Allows the chocolate coating to be melted conveniently.
- Fork or dipping tool — Makes dipping and removing the balls from chocolate easier.
Storage Instructions
Refrigerator
Store the finished Peanut Butter Balls in an airtight container with parchment paper between layers. Refrigerate for up to 7 days for the best texture and flavor.
Freezer
Arrange the balls in a single layer until frozen, then transfer them to a freezer-safe airtight container or zip-top freezer bag. They can be frozen for approximately 2–3 months.
Thawing
Move frozen balls to the refrigerator and allow them to thaw for several hours or overnight. They can also be enjoyed partially frozen for a firmer, fudgy texture.
Proper portioning and storage make these convenient for maintaining a protein-friendly snack routine without needing to prepare dessert every day.
Recipe Details
Preparation Time: 20 minutes
Chilling Time: 45 minutes
Cooking Time: 5 minutes
Total Time: 1 hour 10 minutes
Servings: 18 Peanut Butter Balls
Best Season: All-season
Total Calories: Approximately 165 calories per serving
📝 Ingredients
Peanut Butter Protein Center
- 1 cup (240 g) natural creamy peanut butter
- ¾ cup (approximately 60 g) vanilla whey protein powder
- ½ cup (48 g) almond flour
- 2 tablespoons powdered allulose or monk-fruit sweetener
- 1 teaspoon pure vanilla extract
- ¼ teaspoon fine sea salt
- 2–4 tablespoons unsweetened almond milk, as needed
Chocolate Coating
- 1½ cups (255 g) sugar-free dark or semi-sweet chocolate chips
- 1 tablespoon coconut oil
Optional Garnish
- 1 tablespoon finely chopped roasted peanuts
- Pinch of flaky sea salt
- 2 tablespoons additional melted sugar-free chocolate for drizzling
Ingredient note: Protein powders vary in sweetness and absorbency. Start with 2 tablespoons of almond milk and add more only if the mixture is too dry. For a lower-carbohydrate version, choose unsweetened peanut butter and check the labels of your protein powder and chocolate carefully.
Directions
1. Prepare the Peanut Butter Mixture
Add the peanut butter, whey protein powder, almond flour, powdered sweetener, vanilla extract, and sea salt to a large mixing bowl.
Stir with a spatula over room temperature until a thick dough begins to form.
2. Adjust the Texture
Add unsweetened almond milk 1 tablespoon at a time.
Mix after each addition until the mixture becomes soft enough to hold together when pressed but is not wet or sticky.
High-protein tip: Don’t add all the milk at once because different protein powders require different amounts of liquid.
3. Portion the Mixture
Using a small cookie scoop, divide the mixture into approximately 18 equal portions.
Roll each portion between your palms until smooth and round.
The finished balls should feel firm enough to hold their shape.
4. Chill the Balls
Place the balls on a parchment-lined tray.
Refrigerate for approximately 30–45 minutes, or until noticeably firm.
Chilling helps prevent the peanut butter centers from becoming too soft during dipping.
5. Melt the Chocolate
Place the sugar-free chocolate chips and coconut oil in a microwave-safe bowl.
Microwave at 50% power for 20–30 seconds at a time, stirring thoroughly after each interval.
Continue until the chocolate is smooth and glossy.
Texture cue: The chocolate should flow easily from a spoon but should not be extremely hot.
6. Coat the Peanut Butter Balls
Using a fork or dipping tool, place one chilled peanut butter ball into the melted chocolate.
Roll it gently until completely coated.
Lift it out and allow excess chocolate to drip back into the bowl.
7. Set the Chocolate
Place each coated ball onto parchment paper.
If desired, sprinkle immediately with chopped peanuts or a tiny pinch of flaky sea salt before the chocolate sets.
8. Add a Chocolate Drizzle
For an attractive finish, drizzle a small amount of remaining melted chocolate over the tops.
Allow the drizzle to set naturally.
9. Chill Until Firm
Return the coated balls to the refrigerator for approximately 15–20 minutes.
They are ready when the chocolate coating feels firm and no longer looks wet.
10. Serve
Serve chilled or allow the balls to sit at room temperature for 5–10 minutes before eating for a softer peanut butter center.
Nutrition Facts
Per 1 Peanut Butter Ball — Approximate
| Nutrient | Approximate Amount |
|---|---|
| Calories | 165 kcal |
| Fat | 12 g |
| Cholesterol | 5 mg |
| Sodium | 105 mg |
| Potassium | 145 mg |
| Total Carbohydrates | 9 g |
| Fiber | 3 g |
| Net Carbs | 6 g |
| Sugars | 1 g |
| Protein | 8 g |
| Calcium | 45 mg |
Nutrition disclaimer: These figures are approximate estimates calculated from typical ingredient values. Actual nutrition can vary substantially depending on the peanut butter, protein powder, sweetener, almond flour, and sugar-free chocolate brands used.
Notes
- For a firmer center: Refrigerate the shaped balls longer before chocolate dipping.
- For a softer center: Add almond milk gradually until the mixture reaches your preferred consistency.
- Chocolate tip: Avoid getting water into melted chocolate because it can cause the chocolate to seize.
- Allergy note: This recipe contains peanuts, almonds, milk, and potentially other allergens depending on the protein powder and chocolate used.
- Nut-free adaptation: Peanut butter itself cannot be removed while keeping this a traditional peanut butter ball, but sunflower seed butter can be substituted if appropriate.
- Flavor boost: Add ½ teaspoon cinnamon or a small pinch of espresso powder to intensify the chocolate flavor.
- Extra crunch: Mix finely chopped roasted peanuts into the center or sprinkle them over the chocolate coating.
- Reheating: No reheating is necessary; these are designed to be served chilled or slightly softened at room temperature.
- Diabetes-conscious option: Choose unsweetened peanut butter, a low-sugar protein powder, and sugar-free chocolate, and check the carbohydrate content of each product.
Frequently Asked Questions
1. Are Peanut Butter Balls high in protein?
Yes, each ball provides approximately 8 g of protein, mainly from whey protein powder and peanut butter.
2. Can I make these Peanut Butter Balls without protein powder?
Yes, but removing the protein powder will substantially reduce the protein content and may require adjusting the almond flour and liquid.
3. Can I use crunchy peanut butter?
Absolutely, although the balls will have a more textured center and may be slightly harder to shape.
4. How long do Peanut Butter Balls last in the refrigerator?
Stored in an airtight container, they can remain fresh for approximately 7 days.
5. Can I freeze Peanut Butter Balls?
Yes, they freeze well for approximately 2–3 months when properly sealed in a freezer-safe container.
6. Are these Peanut Butter Balls diabetic-friendly?
They can be a lower-sugar, portion-controlled dessert option, but carbohydrate needs differ between individuals, so check the actual nutrition labels of your ingredients and consider your personal dietary plan.