
Description
These Chocolate Fudge Ice Cream Bars are rich, creamy, chocolatey, and surprisingly simple to make. A smooth high-protein base is blended until silky, frozen until firm, then coated in a glossy layer of chocolate for an irresistible fudge-bar finish.
They make a satisfying low-carb dessert when prepared with unsweetened cocoa and a sugar-free chocolate coating. The protein-rich base also makes these bars more filling than many traditional frozen chocolate desserts.
Diabetes-friendly note: Using unsweetened cocoa, a suitable no-added-sugar sweetener, and sugar-free chocolate can keep the carbohydrate content relatively low, but individual products and portions vary. People managing diabetes should check the actual nutrition labels for their ingredients.
Can This Chocolate Fudge Ice Cream Bars Support Weight Loss Goals?
These bars can fit into a weight-conscious eating pattern when enjoyed in an appropriate portion. The protein-rich base can make the dessert more satisfying, while using unsweetened cocoa and a low-sugar chocolate coating can help reduce added carbohydrates compared with conventional fudge desserts.
However, weight loss depends on overall calorie intake, food choices, and lifestyle rather than one recipe alone. Keeping the serving size moderate is especially important because the chocolate coating still contributes calories and fat.
Does Chocolate Fudge Ice Cream Bars Fit a High-Protein Lifestyle?
Yes, these bars can fit a high-protein lifestyle because the main base uses protein-rich cottage cheese and Greek yogurt.
Using unsweetened cocoa adds deep chocolate flavor without contributing much carbohydrate.
The net carbs can remain relatively modest when a low-carb sweetener and sugar-free chocolate are selected.
For the best protein-to-calorie balance, choose low-fat or reduced-fat cottage cheese and Greek yogurt.
Why This Recipe Is Special
- High-protein: Cottage cheese and Greek yogurt provide a protein-rich frozen dessert base.
- Low-carb option: Unsweetened cocoa and a low-carb sweetener help keep carbohydrates controlled.
- Rich chocolate flavor: Cocoa and chocolate coating create an indulgent fudge-like taste.
- Make-ahead friendly: The bars can be prepared in advance and stored in the freezer.
- Simple ingredients: No complicated baking process or specialty equipment is required.
My Personal Experience
- The texture is the highlight.
Blending the cottage cheese and yogurt creates a remarkably smooth chocolate base.
Once frozen, it has a dense, creamy texture that feels much more indulgent than expected. - The chocolate coating makes them special.
The thin chocolate shell adds a satisfying contrast to the soft fudge center.
It also gives the bars their beautiful finished appearance. - They are excellent for chocolate cravings.
The combination of cocoa, sweetener, and chocolate coating delivers plenty of chocolate flavor.
One chilled bar can feel like a proper dessert rather than a compromise. - I like making them ahead.
Having individual bars ready in the freezer makes portion control much easier.
They can be grabbed whenever a cold chocolate treat sounds appealing. - The protein-rich base is convenient.
Cottage cheese and Greek yogurt make it easy to add substantial protein to a dessert.
That makes these bars particularly useful for people who enjoy protein-focused recipes.
Perfect For
These Chocolate Fudge Ice Cream Bars are perfect for summer desserts, afternoon snacks, after-dinner treats, meal-prep desserts, and low-carb eating plans. They are also convenient for busy weeknights because you can prepare a batch and keep individual portions frozen.
They work especially well when you want something chocolatey and cold without making a traditional baked dessert. Keep them individually wrapped so a ready-to-eat portion is always available.
Why You’ll Love This Recipe
- Ultra chocolatey: Cocoa and chocolate coating provide layers of rich chocolate flavor.
- Creamy center: The blended dairy base creates a smooth, fudge-like frozen texture.
- Protein-focused: Cottage cheese and Greek yogurt make the recipe naturally protein-rich.
- Low-carb adaptable: Choosing appropriate sweeteners and chocolate keeps the recipe lower in carbohydrates.
- No oven required: Everything is prepared cold or with gentle melting, making it especially convenient.
- Freezer-friendly: Make a whole batch once and enjoy individual bars throughout the week.
Common Mistakes to Avoid
- Not blending the cottage cheese enough — Blend until completely smooth so the finished bars don’t have a grainy texture.
- Using very bitter cocoa without adjusting sweetness — Taste the mixture before freezing and add sweetener gradually.
- Freezing the bars uncovered — Exposure to air can cause freezer burn and unwanted ice crystals.
- Using overheated chocolate for the coating — Melt chocolate gently and allow it to cool slightly before coating the frozen bars.
Required Equipment
- High-speed blender or food processor — Creates a smooth, creamy chocolate base.
- Mixing bowl — Makes combining and tasting the ingredients easy.
- Loaf pan or bar mold — Gives the mixture a convenient bar shape.
- Parchment paper — Helps remove the frozen slab cleanly.
- Microwave-safe bowl — Allows the chocolate coating to be melted gently.
- Sharp knife — Makes clean, even portions once frozen.
Recipe Details
Preparation Time: 15 minutes
Cooking Time: 3–5 minutes
Freezing Time: 4–6 hours
Total Time: About 4 hours 20 minutes
Servings: 8 bars
Best Season: Summer, but suitable for all seasons
Total Calories: Approximately 230 calories per serving
📝 Ingredients
Chocolate Fudge Base
- 2 cups cottage cheese, preferably low-fat
- 1 cup plain Greek yogurt, preferably high-protein
- ¼ cup unsweetened cocoa powder
- ⅓ cup powdered monk fruit/erythritol sweetener, or to taste
- 1 teaspoon vanilla extract
- ¼ teaspoon salt
- 2 tablespoons unsweetened almond milk, only if needed for blending
Chocolate Coating
- 6 oz sugar-free dark chocolate or low-carb chocolate chips
- 1 tablespoon coconut oil
Ingredient note: Choose unsweetened or no-added-sugar products where possible, and check the nutrition label of your chosen chocolate because carbohydrate and calorie values vary between brands.
Directions
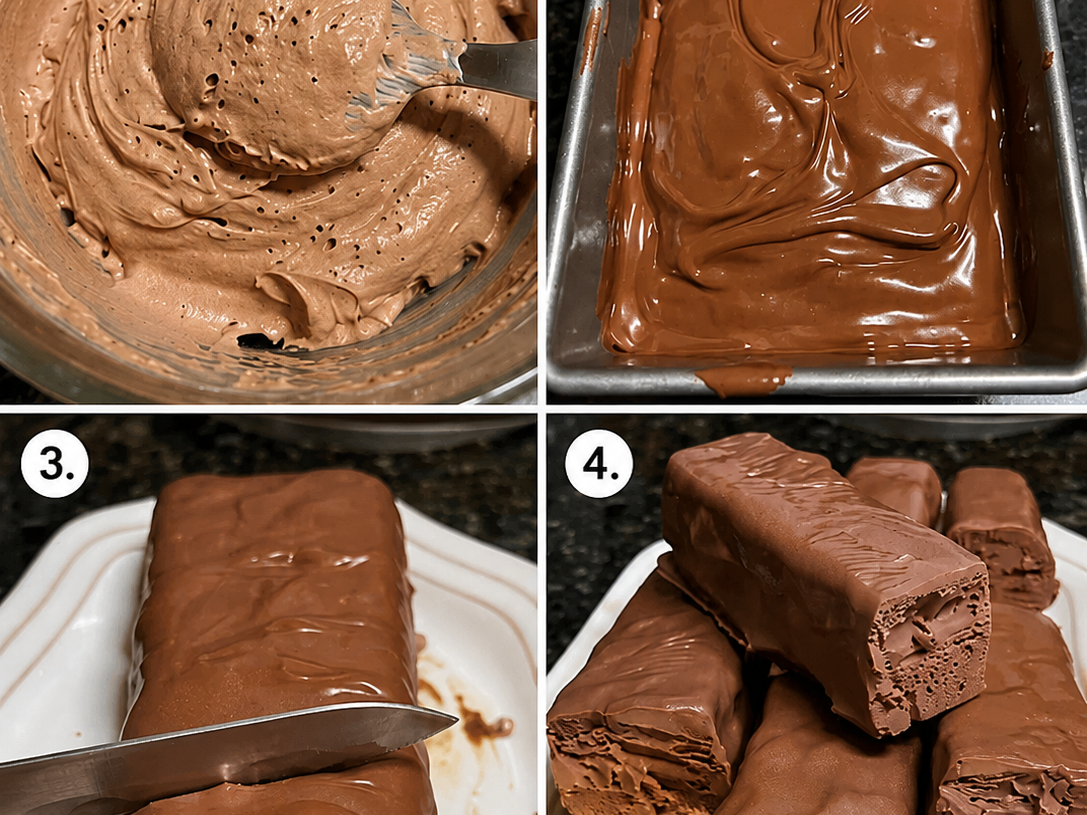
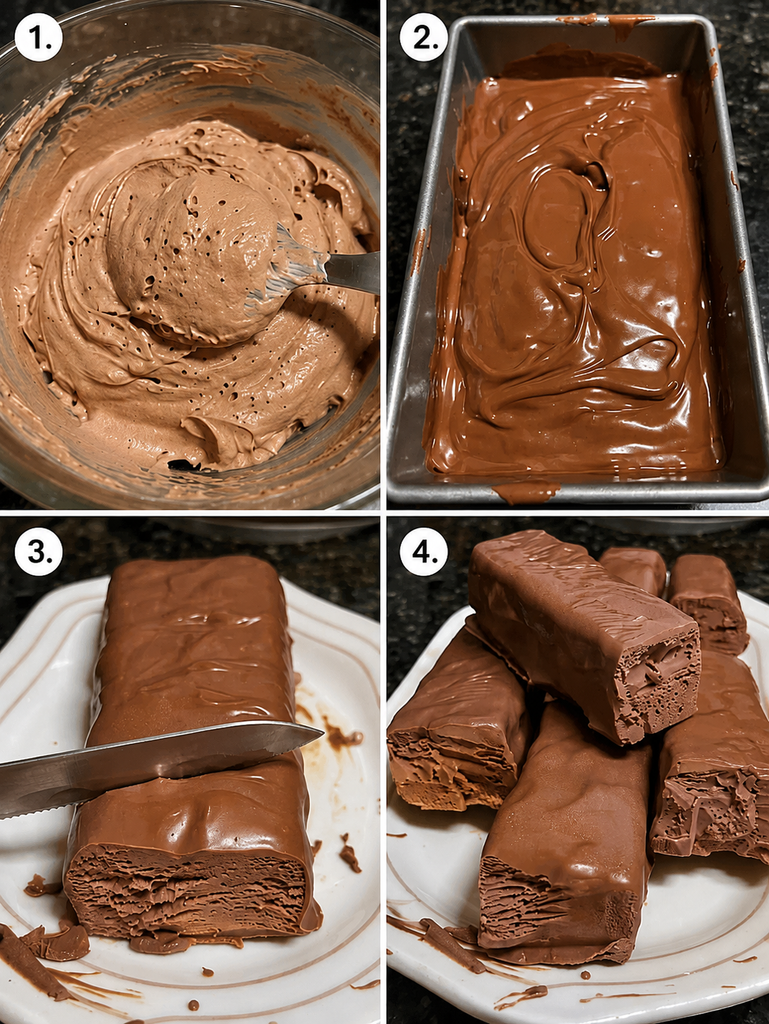
1. Prepare the chocolate base
Add the cottage cheese, Greek yogurt, cocoa powder, powdered sweetener, vanilla extract, and salt to a high-speed blender.
Blend on medium-high speed for 1–2 minutes, scraping the sides if necessary. Continue until the mixture looks completely smooth, thick, and glossy.
High-protein tip: Avoid adding unnecessary liquid. Use only a small amount of almond milk if your blender needs help processing the mixture.
2. Taste and adjust
Taste the chocolate mixture before freezing. Add another tablespoon of sweetener if you prefer a sweeter dessert.
The mixture should taste noticeably chocolatey and slightly sweeter than you want the finished frozen bar because freezing can dull perceived sweetness.
3. Transfer to the pan
Line a loaf pan with parchment paper, leaving some paper hanging over the sides.
Pour in the chocolate mixture and smooth the surface with a spatula.
4. Freeze
Place the pan in the freezer for 4–6 hours, or until the center is completely firm.
For the cleanest slices, allow the mixture to freeze overnight.
5. Cut into bars
Remove the frozen chocolate slab using the parchment paper.
Let it sit at room temperature for approximately 5 minutes, then use a sharp knife to cut it into 8 bars.
6. Prepare the chocolate coating
Place the sugar-free chocolate and coconut oil in a microwave-safe bowl.
Microwave at 50% power in 20–30-second intervals, stirring thoroughly between each interval. Continue until smooth.
Do not overheat the chocolate; it should be melted and glossy rather than extremely hot.
7. Coat the frozen bars
Dip or spoon the melted chocolate over each frozen bar.
Work relatively quickly because the frozen surface will cause the chocolate to set almost immediately.
8. Finish and freeze
Place the coated bars on parchment paper.
Return them to the freezer for 10–15 minutes, or until the chocolate shell is completely firm.
9. Serve
For the best texture, remove one bar from the freezer and let it stand for 3–5 minutes before eating.
The center should be firm but creamy, while the chocolate coating should have a satisfying snap.
Nutrition Facts
Per Serving — Approximate
| Nutrient | Amount |
|---|---|
| Calories | 230 kcal |
| Fat | 14 g |
| Cholesterol | 10 mg |
| Sodium | 220 mg |
| Potassium | 190 mg |
| Total Carbohydrates | 12 g |
| Fiber | 4 g |
| Net Carbs | 8 g |
| Sugars | 3 g |
| Protein | 13 g |
| Calcium | 120 mg |
Nutrition values are approximate and will vary depending on the cottage cheese, Greek yogurt, sweetener, chocolate, and other brands used.
Notes
- Storage: Keep finished bars in an airtight freezer-safe container for up to 2–3 weeks for the best texture and flavor.
- Refrigerator: If thawed completely, store in a covered container in the refrigerator and enjoy within 2 days; the texture will become considerably softer.
- Freezer protection: Separate bars with parchment paper to prevent them from sticking together.
- Reheating: These bars should not be reheated; simply allow them to soften at room temperature for a few minutes before serving.
- Allergy note: This recipe contains milk/dairy and may contain coconut depending on the coating. Check chocolate labels for additional allergens.
- Flavor boost: Add a small amount of espresso powder for deeper chocolate flavor.
- Extra crunch: Chopped sugar-free nuts can be sprinkled over the chocolate coating before it sets.
- Protein boost: Choose Greek yogurt with a higher protein content and low-fat cottage cheese to increase the protein-to-calorie ratio.
Frequently Asked Questions
1. Can I make these Chocolate Fudge Ice Cream Bars without cottage cheese?
Yes, although the cottage cheese provides much of the creamy texture and protein, so replacing it will change the nutritional profile.
2. Can I use regular chocolate?
Yes, but regular chocolate will generally increase the sugar and carbohydrate content compared with sugar-free or no-added-sugar chocolate.
3. How long should the bars freeze?
Freeze them for at least 4–6 hours, although overnight freezing produces the firmest and easiest-to-cut bars.
4. Why is my frozen center icy?
Excess liquid can create ice crystals, so use only the small amount of almond milk needed to help your blender process the mixture.
5. Can I make the bars ahead of time?
Absolutely—these bars are ideal for make-ahead desserts and can be portioned individually before storing in the freezer.
6. Are these truly diabetic-friendly?
They can be adapted to be lower in carbohydrates and added sugar, but “diabetic-friendly” depends on the individual’s dietary needs, portion size, and the exact ingredients used, so always check the final nutrition information.