
Ingredients
Here’s everything you’ll need to make this delightful, WW-friendly fudge:
- 1 cup natural peanut butter (smooth or creamy, unsweetened)
- ½ cup unsweetened cocoa powder
- ¼ cup pure maple syrup or honey
- ⅓ cup unsweetened almond milk (or skim milk)
- 1 teaspoon pure vanilla extract
- A pinch of salt
- Optional toppings: Mini chocolate chips, crushed peanuts, or sea salt flakes
Step 1: Prepare Your Pan
Line an 8×8-inch baking pan with aluminum foil or parchment paper, leaving a bit of overhang on the sides for easy removal later. Lightly spray with nonstick cooking spray or brush with a little oil. This will ensure your fudge releases cleanly once it’s set.
Step 2: Melt and Combine the Base
In a medium saucepan, add the peanut butter, maple syrup (or honey), and almond milk. Heat gently over low to medium heat, stirring constantly until the mixture becomes smooth and slightly glossy. This step melts the peanut butter and allows the sweetener to blend evenly, forming a luscious base for the fudge.
Avoid boiling the mixture — gentle heat ensures the fudge remains creamy and prevents separation of oils.
Step 3: Incorporate the Cocoa and Flavoring
Once the base is smooth, remove the pan from the heat. Stir in the unsweetened cocoa powder, vanilla extract, and salt. Mix thoroughly until the cocoa is completely dissolved and the mixture takes on a rich, thick consistency.
This step gives the fudge its deep chocolate flavor and silky texture. The combination of cocoa and peanut butter creates a decadent mouthfeel — one that rivals even traditional fudge recipes.
Step 4: Adjust Sweetness and Consistency
At this stage, taste the mixture. If you prefer your fudge a bit sweeter, you can add a teaspoon of monk fruit sweetener, stevia, or additional maple syrup. For a softer texture, stir in a splash more almond milk; for firmer fudge, add an extra tablespoon of cocoa powder.
Customization ensures the final product aligns perfectly with your preferences and WW plan.
Step 5: Spread and Smooth
Pour the mixture into your prepared pan. Using a spatula, spread it evenly, smoothing out the top for a professional, glossy appearance. If desired, sprinkle the surface with mini chocolate chips, crushed peanuts, or a light dusting of sea salt flakes — each adds a delightful textural contrast and enhances visual appeal.
Step 6: Chill to Set
Place the pan in the refrigerator for at least 2 hours, or until the fudge is firm to the touch. For a denser, more traditional texture, let it chill overnight. Once set, lift the fudge out using the parchment overhang and place it on a cutting board. Use a sharp knife to slice it into 16 small squares — each one a perfect bite-sized portion.
Texture and Flavor Notes
This WW Chocolate Peanut Butter Fudge is smooth, creamy, and rich without being overly sweet. The cocoa flavor shines through beautifully, balanced by the subtle nuttiness of peanut butter. The texture is velvety yet firm enough to hold its shape — a perfect hybrid of a truffle and traditional fudge.
The best part? Each piece melts gently on the tongue, leaving behind that irresistible combination of chocolate and peanut butter that’s both comforting and indulgent.
Nutritional Benefits
This fudge isn’t just a treat — it’s a smart snack. Thanks to natural peanut butter and unsweetened cocoa, it’s packed with healthy fats, plant-based protein, and antioxidants. The portion-controlled squares make it easy to manage your WW points while still enjoying dessert.
On most WW plans, each serving counts for around 3–4 points, depending on the brands used and portion size. It’s a satisfying sweet bite that fits beautifully into a balanced day.
Storage Tips
Store your fudge in an airtight container in the refrigerator for up to one week. For longer storage, place pieces in a freezer-safe bag and freeze for up to three months. To enjoy, simply let them thaw at room temperature for about 10–15 minutes.
Pro tip: Keep a few in the freezer for those sudden chocolate cravings — they make for an instant portion-controlled indulgence!
Healthy Ingredient Insights
- Peanut Butter: Provides protein and heart-healthy fats. Choose natural varieties without added sugar or hydrogenated oils.
- Cocoa Powder: Offers antioxidants that support heart and brain health.
- Maple Syrup: Adds sweetness naturally while contributing trace minerals like manganese and zinc.
- Almond Milk: Keeps the recipe light and dairy-free.
Every ingredient plays a role in creating a balanced treat that nourishes your body while satisfying your sweet tooth.
Variations and Customizations
One of the best things about this recipe is how adaptable it is. Try these variations:
- Chocolate Almond Fudge: Replace peanut butter with almond butter.
- Mint Chocolate Fudge: Add a drop of peppermint extract.
- Protein Boost: Mix in a scoop of chocolate protein powder before chilling.
- Vegan Option: Use plant-based milk and maple syrup.
- Crunchy Fudge: Stir in crushed nuts or cacao nibs before setting.
Each variation offers a new flavor profile while keeping the base recipe WW-friendly.
Cooking Tips for Success
- Always use gentle heat when melting the ingredients — overheating can cause separation.
- Mix continuously for a smooth, lump-free texture.
- For cleaner cuts, dip your knife in warm water and wipe it between slices.
- Avoid over-sweetening — balance is key for a satisfying fudge.
These small details can elevate your fudge from good to extraordinary.
The Science Behind the Texture
Traditional fudge relies on sugar crystallization for structure, but this version achieves firmness through natural thickening from cocoa and nut butter. The fats from peanut butter solidify when chilled, creating a rich yet stable texture without the need for refined sugar or heavy cream.
Perfect Occasions to Serve WW Fudge
This fudge is ideal for:
- Holiday dessert platters
- Office treats or potlucks
- After-dinner indulgences
- Midday pick-me-ups
- Guilt-free snacking
Its elegant appearance and balanced flavor make it equally suitable for special occasions or everyday enjoyment.
Presentation for Your Website
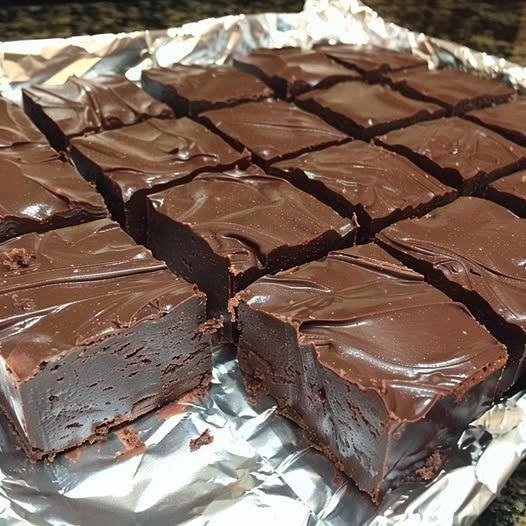
For your food blog, highlight the glossy finish and smooth texture of the fudge with close-up shots under natural light. Serve pieces on a mirrored tray or rustic cutting board for contrast. Add descriptive, SEO-friendly alt text such as:
“Squares of WW chocolate peanut butter fudge arranged on foil, with a glossy, rich chocolate surface.”
SEO Optimization Tips
Include target keywords naturally throughout your article:
- WW chocolate peanut butter fudge
- Healthy fudge recipe
- Low-point dessert ideas
- Keto-friendly fudge
- No-bake chocolate treats
These keywords will improve visibility and attract readers looking for healthier dessert options.
A Brief Culinary Insight
Fudge has roots in American confectionery dating back to the late 19th century. While traditional fudge was a decadent mix of sugar and cream, modern adaptations like this WW-friendly version prove that culinary creativity can reinvent even the most indulgent classics into lighter, health-conscious delights.
Final Thoughts
This WW Chocolate Peanut Butter Fudge is proof that you don’t have to choose between flavor and wellness. Each piece is creamy, rich, and deeply satisfying — a perfect way to indulge mindfully. It’s a dessert that fits into your lifestyle, whether you’re tracking points, cutting sugar, or simply trying to make better food choices.
Enjoy a square (or two!) whenever you crave something sweet and decadent — and feel good knowing it aligns beautifully with your goals.
Printable Recipe Summary
Prep Time: 10 minutes
Chill Time: 2 hours
Total Time: 2 hours 10 minutes
Servings: 16 pieces
Ingredients:
Peanut butter, cocoa powder, maple syrup, almond milk, vanilla, salt
Instructions:
- Melt peanut butter, syrup, and milk over low heat.
- Stir in cocoa, vanilla, and salt.
- Spread into lined pan and smooth.
- Chill 2 hours, then cut into squares.