
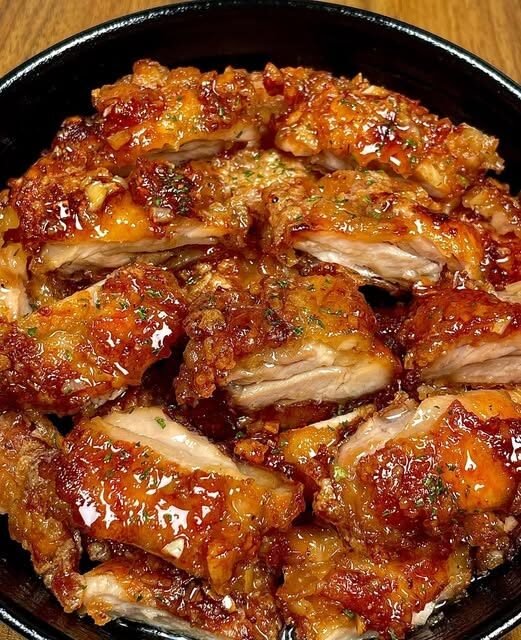
Sticky Honey Garlic Glazed Chicken Thighs
These Sticky Honey Garlic Glazed Chicken Thighs are juicy and tender inside, beautifully browned on the outside, and coated in a glossy sweet-and-savory garlic glaze. The caramelized sauce clings to every piece of chicken, creating the rich, golden finish shown in the photo.
This recipe uses a simple two-stage method: first brown the chicken to develop a flavorful crust, then finish it with a homemade honey-garlic glaze. Honey, garlic, soy sauce, vinegar, and seasonings are a classic combination for glazed chicken thighs. (Food Network)
Recipe Details
Prep Time: 15 minutes
Marinating Time: 30 minutes, optional
Cook Time: 30–35 minutes
Total Time: About 1 hour
Servings: 6
Cuisine: American-inspired / Asian-inspired
Category: Chicken Dinner
Ingredients
For the Chicken
- 2½ lb (1.1 kg) boneless, skinless chicken thighs
- 1 tablespoon olive oil
- 1 teaspoon paprika
- 1 teaspoon garlic powder
- ½ teaspoon onion powder
- ½ teaspoon smoked paprika
- ½ teaspoon black pepper
- ¾ teaspoon salt
- ½ teaspoon dried parsley
- ½ teaspoon dried thyme
For the Honey Garlic Glaze
- ⅓ cup honey
- ¼ cup low-sodium soy sauce
- 2 tablespoons apple cider vinegar or rice vinegar
- 5 cloves garlic, finely minced
- 1 tablespoon fresh lemon juice
- 1 teaspoon grated fresh ginger
- 1 tablespoon butter
- 1 tablespoon water
- 1 teaspoon cornstarch
- ½ teaspoon black pepper
- ¼ teaspoon red pepper flakes, optional
For Garnishing
- 1 tablespoon finely chopped fresh parsley
- 1 teaspoon sesame seeds, optional
- 1 green onion, thinly sliced
- Lemon wedges, optional
How to Make Honey Garlic Chicken Thighs
1. Prepare the Chicken
Place the chicken thighs on a clean cutting board and pat them dry thoroughly with paper towels.
Removing excess surface moisture helps the chicken brown more effectively during cooking.
If the thighs are particularly large, you can gently trim excess fat and divide them into smaller portions.
2. Season the Chicken
Combine the paprika, garlic powder, onion powder, smoked paprika, black pepper, salt, dried parsley, and thyme in a small bowl.
Sprinkle the seasoning mixture evenly over both sides of the chicken.
Gently press the seasoning into the meat so it adheres properly.
3. Let the Seasoning Absorb
For the best flavor, let the seasoned chicken rest in the refrigerator for 30 minutes.
If you’re short on time, you can cook it immediately. The resting period simply gives the seasonings more opportunity to flavor the chicken.
4. Prepare the Glaze
While the chicken rests, combine the honey, soy sauce, vinegar, minced garlic, lemon juice, ginger, black pepper, and red pepper flakes in a bowl.
Whisk everything together.
Set aside about ⅓ cup of the sauce before it comes into contact with raw chicken if you intend to use it for finishing or serving. Never reuse a marinade that has touched raw chicken unless it is thoroughly cooked first.
5. Make the Cornstarch Mixture
In a separate small bowl, mix the cornstarch with 1 tablespoon water.
Stir until completely smooth.
This mixture will help the glaze thicken and become glossy without requiring a large amount of sauce.
6. Heat the Skillet
Place a large oven-safe skillet over medium-high heat.
Add the olive oil and allow it to become hot but not smoking.
A heavy skillet, such as cast iron, works particularly well for developing a deep golden crust.
7. Brown the Chicken
Place the chicken thighs in the skillet in a single layer.
Avoid overcrowding the pan. If necessary, brown the chicken in two batches.
Cook for approximately 4–6 minutes on the first side, without moving the chicken too much.
8. Flip the Chicken
Turn the thighs carefully and cook the other side for approximately 3–4 minutes.
At this point, the chicken should have a rich golden-brown exterior but does not necessarily need to be completely cooked through.
The chicken will finish cooking when the glaze is added and the dish goes into the oven.
9. Add the Garlic Glaze
Reduce the heat to medium-low.
Pour the honey-soy mixture around and over the chicken.
Because honey contains sugar, keep the heat controlled so the glaze caramelizes rather than burns. Honey-garlic chicken recipes commonly use a similar sweet-savory combination, with care taken to prevent the sugars from burning. (Food Network)
10. Add the Cornstarch Slurry
Stir the cornstarch mixture once more and pour it into the skillet.
Gently move the chicken around so the sauce coats the pieces.
Within a few minutes, the sauce should begin to thicken.
11. Add the Butter
Add 1 tablespoon butter to the sauce.
As it melts, swirl the pan gently.
The butter adds richness and gives the finished glaze an especially smooth appearance.
12. Transfer to the Oven
Preheat the oven to 400°F (200°C).
Transfer the oven-safe skillet to the oven.
Bake for approximately 15–20 minutes, depending on the thickness of the chicken thighs.
13. Check the Chicken
The most important step is checking the internal temperature.
Chicken should reach a minimum internal temperature of 165°F (73.9°C) measured with a food thermometer. USDA guidance specifically recommends using a thermometer to verify poultry has reached the safe temperature. (Ask USDA)
Insert the thermometer into the thickest part of the largest thigh without touching the bone if using bone-in pieces.
14. Glaze Again
When the chicken is fully cooked, carefully remove the skillet from the oven.
Spoon some of the thickened glaze from the bottom of the skillet over each chicken thigh.
For an especially glossy finish, place the skillet back over medium-low heat for 1–2 minutes, turning the chicken gently so the glaze coats every surface.
15. Don’t Overcook the Glaze
Keep an eye on the sauce during this final stage.
The goal is a thick, shiny glaze rather than a dry or burnt coating.
If the sauce becomes too thick, add 1–2 tablespoons of water and stir gently.
16. Rest the Chicken
Remove the skillet from the heat and let the chicken rest for approximately 5 minutes.
This allows the juices to settle and gives the glaze time to cling to the chicken.
17. Garnish
Sprinkle the chicken with chopped fresh parsley.
Add sesame seeds and sliced green onions if desired.
A few lemon wedges on the side provide a bright contrast to the sweet glaze.
18. Serve
Transfer the chicken to a serving platter and spoon the remaining glaze over the top.
Serve immediately while the chicken is warm and the coating is glossy.
Oven-Only Method
If you prefer to avoid stovetop cooking, you can prepare the chicken entirely in the oven.
- Preheat the oven to 425°F (220°C).
- Arrange seasoned chicken thighs on a lightly oiled baking sheet.
- Bake for approximately 20–25 minutes.
- Meanwhile, simmer the honey, soy sauce, garlic, vinegar, ginger, lemon juice, and seasonings in a saucepan.
- Stir in the cornstarch slurry.
- Continue cooking until the glaze thickens.
- Brush the glaze over the chicken.
- Return the chicken to the oven for another 5–8 minutes.
- Brush with another layer of glaze before serving.
- Confirm the chicken reaches 165°F (73.9°C) internally. (Ask USDA)
For an even deeper color, you can briefly broil the glazed chicken at the end while watching it closely.
Air Fryer Method
The recipe can also be adapted for an air fryer.
Preheat the air fryer to 380°F (193°C).
Arrange the seasoned chicken thighs in a single layer.
Cook for approximately 15–20 minutes, turning halfway through.
Prepare the honey-garlic glaze separately on the stovetop.
During the final few minutes, brush the chicken generously with the glaze.
Return it to the air fryer briefly to allow the glaze to caramelize.
Always verify the thickest piece reaches 165°F (73.9°C). (Ask USDA)
How to Get That Beautiful Sticky Finish
The glossy appearance comes from reducing the sauce until it becomes concentrated and thick.
The key is controlling the heat.
Honey can caramelize quickly, so avoid blasting the sauce over very high heat. A medium-low temperature gives the glaze time to thicken while allowing the garlic to become fragrant without burning.
For an even deeper color, allow the browned chicken juices in the skillet to mix with the glaze.
That combination creates a rich sauce with much more flavor than simply pouring a prepared sauce over cooked chicken.
Flavor Variations
Spicy Honey Garlic Chicken
Add ½–1 teaspoon crushed red pepper flakes or a small amount of chili sauce to the glaze.
Lemon Garlic Chicken
Increase the lemon juice to 2 tablespoons and add another teaspoon of lemon zest.
Sesame Ginger Chicken
Add an additional 1 teaspoon grated ginger and finish with sesame seeds and green onions.
Honey Mustard Chicken
Add 1 tablespoon Dijon mustard to the glaze for a sweet-and-tangy variation.
Orange Garlic Chicken
Replace half of the lemon juice with 2 tablespoons fresh orange juice and add 1 teaspoon orange zest.
Extra-Garlicky Chicken
Use 7–8 garlic cloves instead of five for a stronger garlic flavor.
What to Serve With It
These glazed chicken thighs pair particularly well with:
- Steamed rice
- Fried rice
- Roasted potatoes
- Mashed potatoes
- Broccoli
- Green beans
- Roasted carrots
- Corn
- Stir-fried vegetables
- Cucumber salad
- Coleslaw
- Simple green salad
For a complete family-style dinner, serve the chicken with steamed rice and a colorful vegetable side.
Storage
Place leftover chicken in a covered container and refrigerate promptly.
Cooked poultry can generally be refrigerated for up to 4 days when properly handled and kept refrigerated. USDA guidance recommends keeping cooked poultry refrigerated and using safe reheating practices. (Nation Institute of Food and Agriculture)
For the best texture, store the chicken together with a little of the glaze.
Reheating
For the best results, reheat the chicken gently in a covered skillet over medium-low heat.
Add a tablespoon of water if the sauce has become very thick.
You can also reheat it in the oven or air fryer.
When reheating leftovers, heat them thoroughly to 165°F (73.9°C). (Ask USDA)
Make-Ahead Instructions
You can season the chicken several hours ahead of time and keep it refrigerated until you’re ready to cook.
The glaze can also be prepared ahead and refrigerated in a sealed container.
When you’re ready to cook, warm the glaze gently in a saucepan and proceed with the chicken.
For food safety, keep raw chicken refrigerated while preparing ahead and avoid leaving it at room temperature for extended periods.
Approximate Nutrition
Per serving, assuming 6 servings and using the listed ingredients:
- Calories: ~430
- Protein: ~35 g
- Carbohydrates: ~21 g
- Fat: ~23 g
- Fiber: ~1 g
- Sugar: ~18 g
- Sodium: ~650 mg
Nutrition will vary depending on the size of the chicken thighs, amount of glaze consumed, and specific brands of soy sauce and other ingredients.
Frequently Asked Questions
Can I use chicken breasts?
Yes. Chicken breasts can be substituted, but they are leaner and can dry out more easily. Use pieces of similar thickness and check their temperature rather than relying only on cooking time.
Can I use bone-in chicken thighs?
Absolutely. Bone-in thighs work very well with this glaze. They generally require more cooking time, so use the thermometer to determine when they’re done.
Why did my honey glaze burn?
The most common reason is excessive heat. Honey contains sugar and can burn quickly. Reduce the heat once the glaze is added and avoid leaving the pan unattended.
How do I make the chicken more crispy?
Pat the chicken dry before seasoning, avoid overcrowding the skillet, and give the chicken enough time to brown before turning it.
Can I make the sauce without cornstarch?
Yes. Simply simmer the sauce gently for several minutes until it naturally reduces and thickens. It will take somewhat longer and may have a slightly thinner consistency.
Can I use maple syrup instead of honey?
Yes. Maple syrup can be substituted in approximately the same amount, although it will give the sauce a slightly different flavor.
Can I make this recipe less sweet?
Yes. Reduce the honey to ¼ cup and increase the vinegar or lemon juice slightly to maintain balance.
Recipe Summary
Sticky Honey Garlic Glazed Chicken Thighs combine deeply browned chicken with a glossy sauce made from honey, garlic, soy sauce, vinegar, lemon, ginger, and butter. The result is tender chicken covered in a caramelized, savory-sweet glaze with plenty of garlic flavor.
For the best result, brown the chicken first, control the heat once the honey glaze is added, and always verify that the chicken reaches 165°F (73.9°C) before serving. (Ask USDA)