
Ingredients for the Crunch Layer
The base layer typically includes:
- Rolled oats, puffed rice, or a mixture of both
- Your favorite protein powder (vanilla or chocolate)
- Nut butter or seed butter
- A natural sweetener such as honey or maple syrup
- Coconut oil to help bind the mixture
This combination produces a firm yet crispy bottom that supports the other layers while contributing nutritional value.
Ingredients for the Caramel-Like Filling
The middle layer is often the heart of the recipe. It may include:
- Natural nut butter or tahini
- A thick liquid sweetener
- A touch of coconut cream or milk
- Optional protein powder for added richness
- A pinch of sea salt to balance the sweetness
When heated gently, these ingredients blend into a smooth, silky filling that sets beautifully once chilled.
Ingredients for the Chocolate Topping
To create the shiny chocolate top layer, you’ll need:
- Melted dark chocolate or semi-sweet chocolate chips
- A small amount of coconut oil for a glossy finish
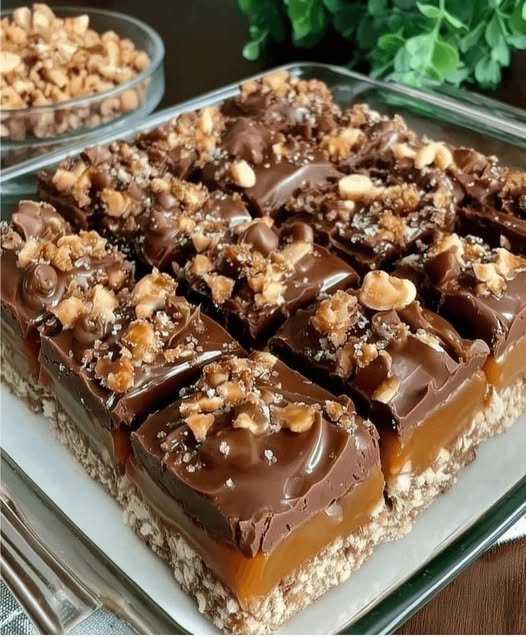
- Crushed nuts, toffee bits, or protein crispies for decoration
The toppings add visual appeal as well as a satisfying crunch.
How to Assemble the Layers
Begin by pressing the crunch layer firmly into a square baking dish lined with parchment. Pack it tightly to ensure it supports the caramel and chocolate layers. Once the base is smooth and compact, pour the caramel mixture over it and spread evenly.
Chilling Between Layers Is Key
Chilling is essential for creating clean layers that do not mix together. After pressing the base, refrigerate it while preparing the caramel. After spreading the caramel layer, chill again before adding the chocolate topping. This ensures each layer stays distinct, creating beautiful bars with well-defined layers.
Pouring the Chocolate Layer
Once the caramel layer has set, pour the melted chocolate evenly over the top. Tilt the dish gently to allow the chocolate to distribute smoothly. While the chocolate is still warm, sprinkle your chosen toppings—nuts, protein crispies, or coarse sea salt—for added texture and aesthetic appeal.
Cutting Into Perfect Squares
Allow the bars to fully chill before cutting. Using a sharp knife warmed briefly under hot water will help achieve clean slices without cracking the chocolate topping. The clear, defined edges make the bars visually impressive, especially for serving guests or photographing for your website.
Flavor Profile and Sensory Experience
Each bite delivers a harmonious balance: the crunch of the base, the caramel-like softness of the middle, the snap of chocolate on top, and the delicate crunch of toppings. The protein powder adds creaminess and depth, making the bars taste indulgent without overwhelming sweetness.
Nutritional Benefits
Thanks to the protein powder, nuts, oats, and dark chocolate, these bars provide healthy fats, fiber, antioxidants, and of course, a protein boost. This combination supports muscle recovery, stabilizes energy levels, and makes the bars more filling than traditional desserts.
Customizing Your Bars
The recipe is extremely versatile. Swap peanut butter for almond or cashew butter, use rice crisps instead of oats, or choose white chocolate instead of dark chocolate. You can even incorporate additional mix-ins such as shredded coconut, chia seeds, or chopped dates.
Vegan and Gluten-Free Options
To make the recipe vegan, choose dairy-free chocolate and plant-based protein powder. For gluten-free versions, ensure the oats are certified gluten-free or use only puffed rice. These simple substitutions allow the bars to suit a wide range of diets.
Storage Instructions
Once prepared, keep the bars in an airtight container in the fridge for up to one week. For long-term storage, freeze them individually wrapped in parchment. They thaw quickly and maintain perfect texture, making them great for meal prepping.
Ideal for Events and Sharing
These bars are not only delicious but visually appealing. Their layered structure and glossy finish make them perfect for potlucks, dessert trays, holiday gatherings, or gifting. They slice cleanly and hold their shape well, making them easy to transport.
Why This Recipe Stands Out
Unlike store-bought protein bars, these homemade crunch bars have no unnecessary fillers or artificial aftertaste. They also avoid the chalkiness that many protein desserts suffer from. Instead, they deliver pure chocolate pleasure combined with nutritious ingredients that leave you feeling good.
Conclusion
These High-Protein Chocolate Crunch Bars are everything a dessert lover could ask for—rich, crunchy, creamy, nutritious, and guilt-free. Whether you’re pursuing fitness goals, meal prepping for the week, or simply craving something sweet, this recipe delivers satisfaction without compromise. Enjoy them as a post-workout treat, a wholesome snack, or a decadent dessert that aligns with your lifestyle.