Introduction: A Classic Sweet Treat with Timeless Appeal
Few desserts can rival the iconic pairing of chocolate and peanut butter. The smooth, velvety sweetness of chocolate and the nutty, creamy richness of peanut butter create a combination that is universally loved. These Chocolate Peanut Butter Balls embody that perfection — a decadent yet simple confection that’s easy to prepare and impossible to resist.
This long-form recipe will take you through every detail of making these delicious little truffles. You’ll learn not only how to prepare them perfectly but also how to store, present, and customize them for any occasion. Whether for a festive holiday platter, edible gift boxes, or a sweet snack at home, these treats are a guaranteed favorite.
The Story Behind Chocolate Peanut Butter Balls
Chocolate peanut butter balls are a nostalgic American treat, often referred to as Buckeye Balls when a small portion of the peanut butter filling is left visible on top (resembling the nut of the Ohio buckeye tree). Their origins date back decades, when home bakers began experimenting with simple, no-bake desserts combining pantry staples — peanut butter, butter, sugar, and chocolate.
Over time, they became a holiday tradition, especially popular during Christmas and festive seasons. Today, these bite-sized delights are cherished around the world for their simplicity, rich flavor, and elegant presentation.
Why You’ll Love This Recipe
- No baking required – simple, quick, and stress-free.
- Rich, creamy texture – the peanut butter filling melts in your mouth.
- Perfect balance of flavors – not too sweet, just the right touch of salt.
- Customizable – you can experiment with coatings, fillings, or decorations.
- Ideal for gifting – they look professional and store beautifully.
Whether you’re a beginner or an experienced baker, this recipe yields professional-quality chocolate peanut butter balls every time.
Ingredients You’ll Need
For the Peanut Butter Filling:
- 2 cups creamy peanut butter (avoid natural or oily varieties)
- ½ cup unsalted butter, softened
- 3 cups powdered sugar, sifted
- 1 teaspoon vanilla extract
- ¼ teaspoon salt (optional but enhances flavor)
For the Chocolate Coating:
- 2 cups semi-sweet or milk chocolate chips
- 2 tablespoons shortening or coconut oil (for smooth melting)
Optional Add-ins or Variations:
- Crushed pretzels for a salty crunch
- A drizzle of white chocolate for decoration
- Sea salt flakes on top for a gourmet finish
- Use dark chocolate for a richer, less sweet version
Step 1: Prepare the Peanut Butter Mixture
In a large mixing bowl, combine the peanut butter and softened butter. Beat using a hand mixer or stand mixer until smooth and creamy. Gradually add the powdered sugar, one cup at a time, mixing on low speed. Once all the sugar is incorporated, add the vanilla extract and continue to blend until the mixture becomes thick but pliable.
If the dough feels too soft, chill it for about 10–15 minutes before shaping. The perfect consistency should be firm enough to roll into balls without sticking to your hands.
Step 2: Shape the Balls
Using a small cookie scoop or tablespoon, portion out the peanut butter mixture and roll it into smooth, even balls about 1 inch in diameter. Place each ball on a parchment-lined baking sheet. You should get around 40–45 pieces, depending on size.
Once shaped, refrigerate the tray for at least 30 minutes (or freeze for 15 minutes). Chilling helps the balls firm up, making them easier to dip in chocolate later.
Step 3: Melt the Chocolate
In a microwave-safe bowl, combine chocolate chips and shortening (or coconut oil). Heat in 30-second intervals, stirring between each, until the chocolate is fully melted and smooth. Alternatively, you can use a double boiler for better control over the melting process.
The addition of shortening helps create a glossy finish and ensures the chocolate sets evenly without cracking.
Step 4: Coat the Peanut Butter Balls
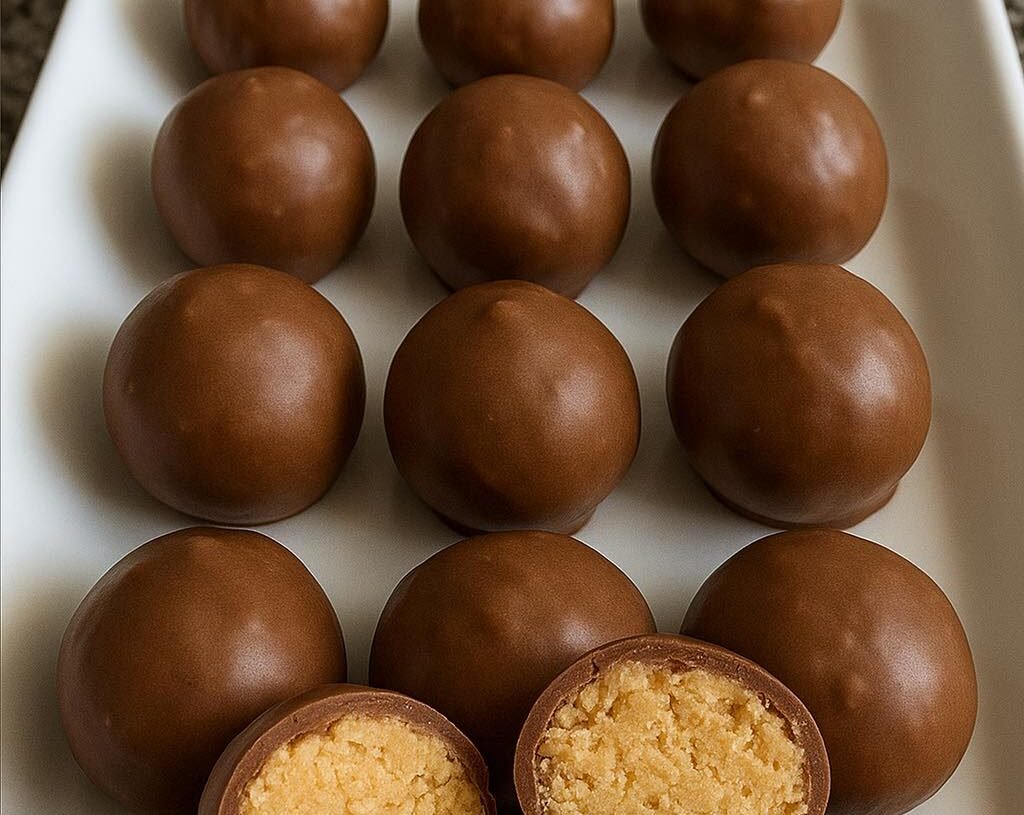
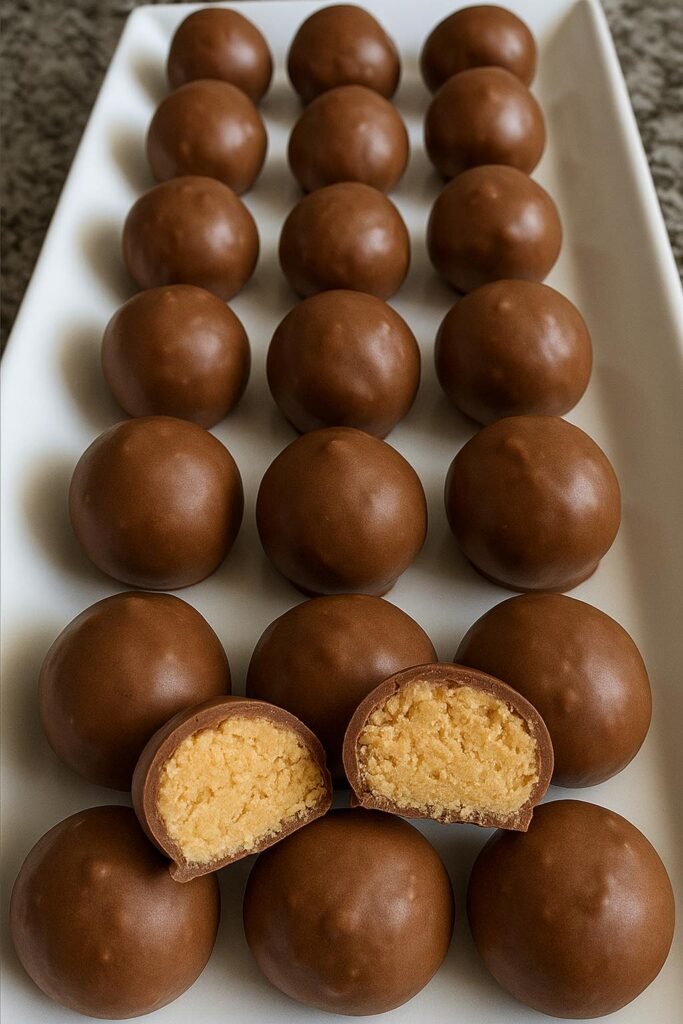
Using a fork, skewer, or dipping tool, carefully dip each chilled peanut butter ball into the melted chocolate. Tap gently on the edge of the bowl to remove excess coating, then place it back onto the parchment-lined sheet. Repeat for all pieces.
For Buckeye-style balls, leave a small portion of the peanut butter exposed at the top by not fully submerging them in chocolate.
Step 5: Set and Chill
Once all the balls are coated, refrigerate them for 1–2 hours until the chocolate shell hardens completely. After setting, transfer them to an airtight container, layering with parchment paper to prevent sticking.
Stored properly, these treats can last:
- In the refrigerator: up to 2 weeks
- In the freezer: up to 3 months
Simply thaw before serving for a perfectly smooth texture.
Step 6: Presentation and Serving Ideas
These truffles look stunning when arranged neatly on a serving platter or placed in mini cupcake liners. You can also package them in decorative boxes or jars as homemade gifts during holidays or special occasions. For parties, serve them alongside coffee, hot cocoa, or dessert wine.
If you’re a food blogger or baker, photographing them in neat rows (like in the image) showcases their uniform beauty and irresistible shine — perfect for social media or your recipe website.
Tips for the Perfect Chocolate Peanut Butter Balls
- Use room-temperature ingredients for a smoother filling.
- Avoid natural peanut butter, which separates and can cause a greasy texture.
- Chill thoroughly before dipping to prevent melting in the chocolate.
- Use high-quality chocolate for the coating — it truly makes a difference.
- Store in a cool place — avoid humidity which can cause condensation.
Flavor Variations and Customizations
These classic treats can be transformed into dozens of creative variations:
- Crunchy Peanut Butter Balls: Use crunchy peanut butter instead of creamy.
- Dark Chocolate Dream: Coat with dark chocolate and sprinkle with sea salt.
- Nut-Free Version: Substitute sunflower seed butter for peanut butter.
- Cookie Butter Twist: Try Biscoff or cookie butter for a caramelized flavor.
- Festive Touch: Roll in sprinkles, cocoa powder, or drizzle colored chocolate on top.
Common Mistakes and How to Avoid Them
- Chocolate Cracking: The filling was too cold; let it sit briefly before dipping.
- Oily Texture: Natural peanut butter or overmixing can cause oil separation.
- Flat Balls: The filling wasn’t chilled long enough before dipping.
- Grainy Filling: Unsifted powdered sugar can lead to texture issues — always sift!
Nutritional Overview
Each peanut butter ball contains approximately:
- Calories: 120–140
- Protein: 3–4g
- Fat: 8–10g
- Carbohydrates: 10–12g
They are rich, satisfying, and best enjoyed in moderation — a little indulgence that goes a long way.
Storage and Make-Ahead Tips
For long-term enjoyment, you can make the peanut butter centers ahead of time and freeze them (uncoated) for up to 2 months. When ready to serve, thaw, dip in chocolate, and chill to set.
If you plan to serve them for an event, prepare them a day in advance — the flavor deepens beautifully after resting overnight.
Why Homemade Beats Store-Bought
Homemade chocolate peanut butter balls have a fresh, creamy texture that no packaged candy can match. You can adjust sweetness, choose your preferred chocolate type, and ensure every bite meets your quality standards. Plus, there’s the satisfaction of creating something so elegant from scratch.
Perfect for Every Occasion
These treats are ideal for:
- Holiday trays and cookie exchanges
- Wedding or baby shower dessert tables
- Gift boxes and party favors
- Snack time indulgence
- Corporate gifts or café displays
Their elegant look, combined with universal appeal, makes them an all-time favorite across all ages.
Pairing Ideas
Pair chocolate peanut butter balls with beverages such as:
- Hot coffee or espresso
- Cold milk or chocolate milk
- Dessert wines or Bailey’s Irish Cream
- Vanilla or caramel lattes
They also complement other desserts like brownies, cupcakes, or fruit platters.
Expert Insight: Achieving the Perfect Glossy Finish
Professional confectioners often temper chocolate to achieve a flawless shine and snap. If you’d like to elevate your presentation, consider tempering your chocolate rather than simply melting it. It’s a bit more work, but the results are stunning and long-lasting — ideal for professional display or gifting.
Conclusion: The Ultimate Bite of Bliss
These Chocolate Peanut Butter Balls are more than just a treat — they’re a comforting bite of nostalgia, indulgence, and craftsmanship. With their rich peanut butter core and silky chocolate shell, they represent everything we love about homemade confections: simplicity, beauty, and unforgettable flavor.
Whether you make them for your family, friends, or customers, this detailed recipe ensures professional-quality results every single time. Keep a batch ready in your fridge, because once people taste them, they’ll disappear faster than you can make them.
Printable Recipe Summary
Prep Time: 30 minutes
Chill Time: 1–2 hours
Total Time: About 2½ hours
Servings: 40–45 balls
Ingredients: Peanut butter, butter, powdered sugar, vanilla, chocolate, shortening.
Instructions:
- Mix peanut butter, butter, sugar, and vanilla into a dough.
- Shape into balls and chill.
- Melt chocolate with shortening.
- Dip and coat evenly.
- Chill to set and enjoy!