

Description
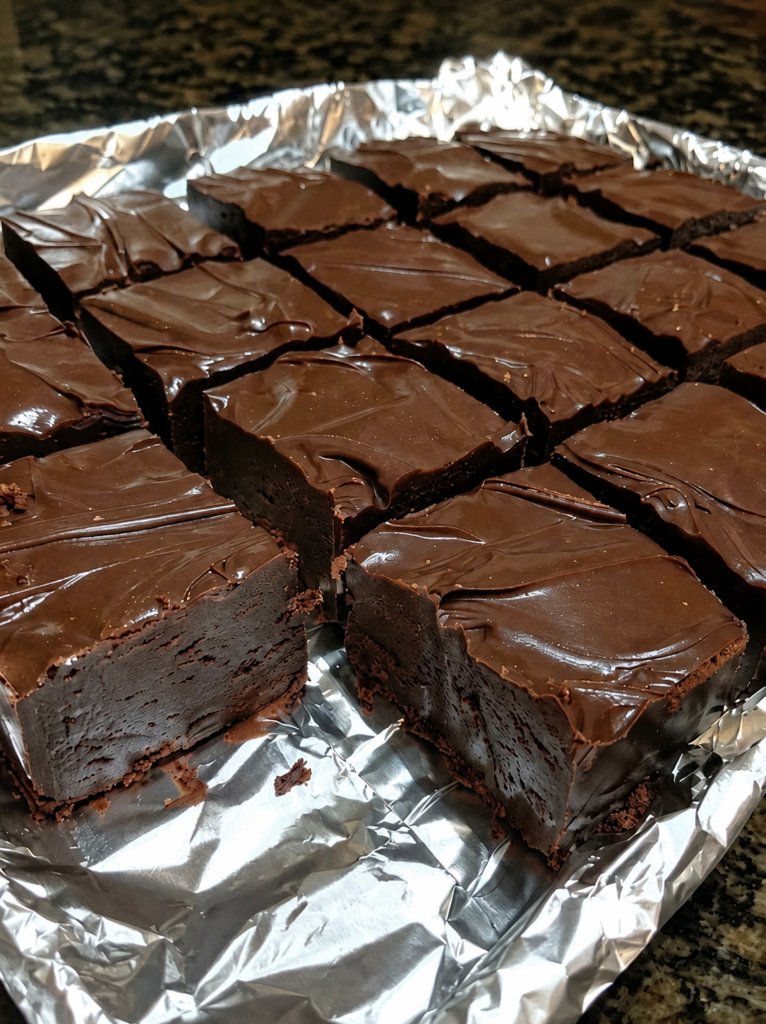
This Chocolate Peanut Butter Fudge combines rich unsweetened cocoa, creamy peanut butter, and protein-rich ingredients for a smooth, intensely chocolatey treat. It has a soft, fudgy texture with plenty of peanut butter flavor while keeping added sugar and carbohydrates relatively low.
It is an easy low-carb, protein-friendly dessert that requires no complicated baking. The combination of cocoa, peanut butter, and protein powder makes it satisfying enough for a planned snack or dessert while fitting nicely into a higher-protein eating pattern.
Can This Chocolate Peanut Butter Fudge Support Weight Loss Goals?
This fudge can fit into a weight-conscious eating plan when enjoyed in a reasonable portion. Using unsweetened cocoa, a zero-sugar sweetener, natural peanut butter, and protein powder helps create a dessert with controlled carbohydrates and some protein. Portion size still matters because peanut butter and coconut oil are calorie-dense ingredients.
Does Chocolate Peanut Butter Fudge Fit a High-Protein Lifestyle?
Yes, this recipe can complement a high-protein lifestyle because it uses whey protein powder alongside peanut butter. Each serving provides approximately 7–8g of protein, while net carbohydrates remain relatively modest. Unsweetened cocoa adds chocolate flavor and fiber without requiring much added carbohydrate. For an even higher-protein snack, pair one piece with Greek yogurt or cottage cheese.
Why This Recipe Is Special
- Low-carb friendly: Uses a sugar-free sweetener instead of traditional granulated sugar.
- Protein-friendly: Whey protein powder adds protein while helping create a creamy fudge texture.
- Quick and easy: The mixture comes together without traditional baking.
- Rich and comforting: Chocolate and peanut butter create a classic dessert combination.
- Meal-prep friendly: The fudge can be portioned and refrigerated or frozen for later.
My Personal Experience
- The chocolate flavor is especially rich.
Unsweetened cocoa gives the fudge a deep chocolate taste without needing a large amount of sugar. - The peanut butter makes the texture wonderfully creamy.
Natural peanut butter adds richness and gives every bite that familiar peanut butter finish. - I like making individual portions.
Cutting the chilled fudge into small squares makes it much easier to enjoy a planned dessert without cutting pieces from the entire batch. - The freezer method is convenient.
Frozen pieces become firm and chewy, making them an excellent make-ahead treat for busy days.
Perfect For
This Chocolate Peanut Butter Fudge is ideal for planned snacks, after-dinner desserts, meal prep, low-carb dessert menus, holiday treat trays, and higher-protein eating plans. Because it stores well, you can prepare a batch ahead of time and keep individual portions available in the refrigerator or freezer.
Why You’ll Love This Recipe
- No complicated baking required.
Simply combine the ingredients, spread the mixture into a lined pan, and chill until firm. - Classic chocolate-peanut butter flavor.
The cocoa and peanut butter combination delivers a rich dessert flavor that feels indulgent. - Easy to portion.
Cutting the fudge into small squares makes serving and tracking portions simple. - Protein-friendly ingredients.
Whey protein powder increases the protein content compared with conventional fudge. - Great for make-ahead desserts.
Refrigerated or frozen pieces can be kept ready whenever a chocolate craving arrives.
Common Mistakes to Avoid
- Using very dry protein powder: Too much powder can make the fudge crumbly. Measure accurately and mix thoroughly.
- Overheating the mixture: Excessive heat can cause the peanut butter and chocolate ingredients to separate.
- Skipping the lining: Parchment paper makes removing the chilled fudge much easier.
- Cutting it while warm: Allow the fudge to become completely firm before slicing for cleaner squares.
Required Equipment
- Small saucepan — Provides gentle, controlled heating for combining the ingredients.
- Silicone spatula — Makes it easy to scrape and thoroughly combine the thick mixture.
- 8-inch square pan — Creates evenly sized fudge pieces with a practical thickness.
- Parchment paper — Prevents sticking and makes lifting the chilled fudge easier.
- Sharp knife — Produces cleaner portions once the fudge is fully chilled.
Storage Instructions
Store finished fudge in an airtight container with parchment paper between layers. Refrigerate for up to 7 days for the best texture and flavor.
For longer storage, arrange individual pieces in a freezer-safe airtight container or freezer bag with parchment between layers. Freeze for up to 2 months. Thaw individual pieces in the refrigerator or enjoy them slightly chilled for a firmer texture.
Keeping portions individually wrapped or separated also makes it easier to maintain consistent serving sizes and preserve the recipe’s protein-friendly profile.
Recipe Details
- Preparation Time: 10 minutes
- Cooking Time: 5 minutes
- Chilling Time: 2–3 hours
- Total Time: Approximately 2 hours 15 minutes
- Servings: 16 squares
- Best Season: All-season
- Total Calories Per Serving: Approximately 115 calories per square
Short 3-Line Description
Rich chocolate and creamy peanut butter come together in this easy low-carb fudge.
Protein powder adds a protein boost while sugar-free sweetener keeps added sugar low.
Chill, slice, and enjoy a convenient chocolate treat whenever you want something sweet.
📝 Ingredients
- ½ cup natural creamy peanut butter — Choose unsweetened peanut butter with minimal added ingredients.
- ¾ cup whey protein powder, chocolate or vanilla — Whey isolate works particularly well for a smoother texture.
- ½ cup unsweetened cocoa powder — Use Dutch-process or natural cocoa according to your preferred flavor.
- ⅓ cup unsweetened almond milk — Helps loosen the mixture and create a creamy consistency.
- 2 tablespoons coconut oil — Adds richness and helps the fudge firm when chilled.
- ⅓ cup powdered allulose or monk-fruit sweetener — Adjust slightly according to the sweetness of your protein powder.
- 1 teaspoon vanilla extract — Enhances the chocolate-peanut butter flavor.
- ¼ teaspoon fine salt — Balances the sweetness and intensifies the chocolate flavor.
- ¼ cup sugar-free dark chocolate chips, optional — Adds extra chocolate flavor and a slightly more decadent texture.
Directions
- Prepare the pan.
Line an 8-inch square pan with parchment paper, leaving some paper hanging over the sides for easy removal. Lightly grease the parchment if desired. - Warm the peanut butter mixture.
Place the peanut butter, almond milk, and coconut oil in a small saucepan. Heat over low heat for 2–3 minutes, stirring constantly. The mixture should become smooth and glossy but should not boil. - Add the cocoa.
Remove the saucepan from the heat. Whisk in the unsweetened cocoa powder gradually until no dry streaks remain. The mixture should look thick, dark, and glossy. - Add the protein powder.
Stir in the whey protein powder a little at a time. Mix continuously until the powder is completely incorporated. High-protein cooking tip: Avoid dumping all the protein powder in at once because it can create dry pockets or lumps. - Sweeten and flavor.
Add the powdered sweetener, vanilla extract, and salt. Stir vigorously until the mixture becomes smooth and fudgy. If using sugar-free chocolate chips, fold them in while the mixture is still warm. - Check the consistency.
The finished mixture should be thick enough to hold soft peaks when stirred. If it seems excessively thick, add 1 teaspoon of almond milk at a time until spreadable. - Transfer to the pan.
Immediately scrape the mixture into the prepared pan. Use a silicone spatula to press and smooth it into an even layer. - Chill until firm.
Refrigerate for 2–3 hours, or until the center feels completely firm when gently pressed. For a firmer texture, freeze for approximately 45–60 minutes. - Slice and serve.
Lift the fudge from the pan using the parchment paper. Cut into 16 equal squares with a sharp knife. For cleaner cuts, wipe the knife between slices. - Serve chilled.
Keep the finished pieces refrigerated until serving. The fudge becomes softer at room temperature and firmer when chilled.
Nutrition Facts — Per Serving (Approximate)
Based on 16 servings; actual nutrition varies by brands and protein powder used.
- Calories: 115 kcal
- Fat: 8.0 g
- Cholesterol: 10 mg
- Sodium: 95 mg
- Potassium: 145 mg
- Total Carbohydrates: 7 g
- Fiber: 2 g
- Net Carbs: 5 g
- Sugars: 1 g
- Protein: 7 g
- Calcium: 45 mg
Notes
- Storage: Refrigerate in an airtight container for up to 7 days or freeze for up to 2 months.
- Reheating: No reheating is necessary; allow frozen pieces to soften in the refrigerator for several minutes before serving.
- Allergy note: This recipe contains peanuts, milk, and potentially tree nuts depending on the protein powder and almond milk used. Use certified alternatives if needed.
- Sweetness: Protein powders vary considerably in sweetness, so taste the mixture before transferring it to the pan and adjust the sweetener if necessary.
- Texture boost: For an even creamier result, use smooth natural peanut butter rather than chunky peanut butter.
- Chocolate boost: Add a small amount of espresso powder to intensify the chocolate flavor without significantly changing the texture.
- Protein tip: For the highest protein content, select a whey isolate with a high percentage of protein per serving and check its nutrition label.
Frequently Asked Questions
1. Can I make this Chocolate Peanut Butter Fudge without whey protein?
Yes, but the texture and nutrition will change, so you may need to slightly adjust the liquid and sweetener.
2. Can I use almond butter instead of peanut butter?
Yes, almond butter can replace peanut butter, although it will create a slightly different flavor and consistency.
3. Is this fudge keto-friendly?
It can fit many low-carb or keto-style eating plans when made with a suitable sugar-free sweetener and low-carb protein powder, but always check the labels of your specific ingredients.
4. How do I make the fudge firmer?
Chill it longer or place it in the freezer for 45–60 minutes before slicing.
5. Why did my fudge become crumbly?
Too much protein powder or cocoa can absorb excess moisture, so add a small amount of almond milk and mix until smooth.
6. Can I make this recipe ahead of time?
Absolutely; it is particularly suitable for make-ahead dessert preparation because the finished squares keep well refrigerated or frozen.